Welcome To MOON DMA
Guide
DMA guide
4K FUSER guide
2K FUSER guide
KMBOX-NET
- MOOD 4K Fuser Guide
⚠ Safety precautions
- The fusion device should be placed naturally and should not block the air vents on both sides.
- Do not place the fusion device next to other heat sources, as it is not conducive to heat dissipation of the fusion device.
- Please use the power supply provided with the product (3C certification, 12V/2A, 5.5-2.1mm)
- Keep away from: water/smoke/fire.
- If not in use for a long time, please cut off the power.
✅ Cable Link Diagram
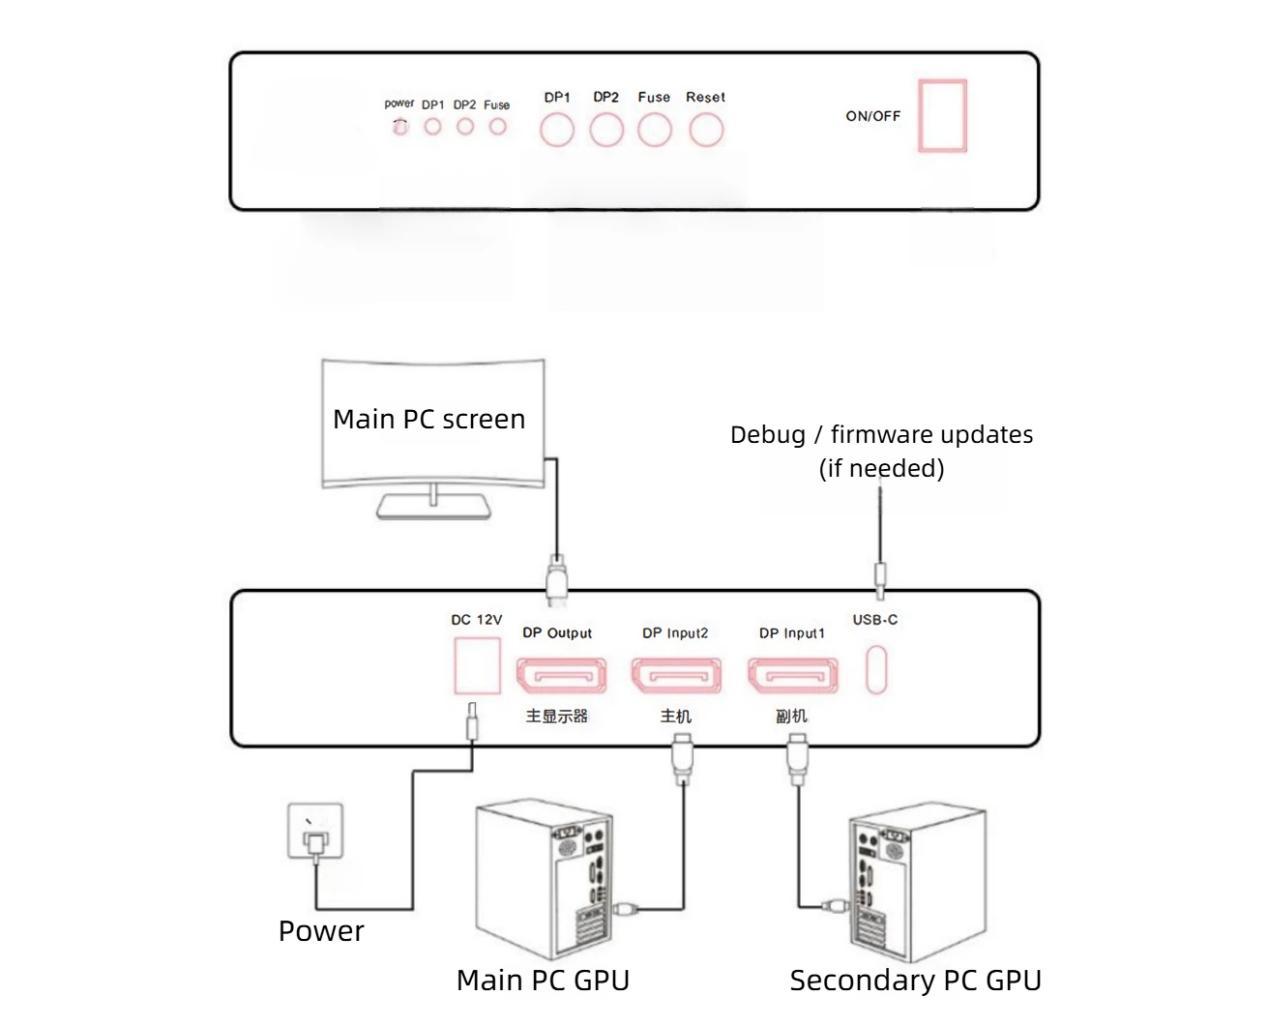
According to the connection diagram above, plug in the 3 DP wires and power cord correspondingly and confirm. Then 2 units Power on the computer and monitor, and wait for them to turn on normally. The fuser device is finally powered on for operation.
- DisplayPort Setup
Main PC GPU → DP2
Secondary PC GPU → DP1
Monitor → DP output
Power & Ports
DC12V2A → Main power
USB-C → Debug / firmware updates (if needed)
- Button Functions
DP1
Short press: Display the screen of the secondary computer
Long press (14s): Switching between RGB and YCB modes: Press and hold the 【 DP1 】 key for 14 seconds, and the 【 Power 】 light will flash before releasing.
⚠ If the display is normal, do not switch the display mode
DP2
Short press:Display the main computer screen
FUSER
Activate the fuser key (continuously switching this key can change the perspective intensity)
RESET
Reset FUSER settings
ON/OFF
Power switch
- Hardware Requirements
Host & Secondary PC GPUs
DP: NVIDIA GTX 10-series / AMD RX 500-series or newer
Monitor and Video Cable
DP1.4 or higher specifications,3 video cables
If the graphics card of the secondary computer does not have a native DP port, but has a MINI DP or USB-C port, you can use a MINIDP to DP video cable or a USB-C to DP video cable. Note that your auxiliary graphics card performance support is required, and the output bandwidth of the conversion cable should support DP1.4 version.
- Resolution & Refresh Rate Support
Actual limits depend on GPU generation and DSC behavior.
3840*2160@60Hz/120Hz/144Hz
2560*1440@144Hz/240Hz/260Hz
1920*1080@240Hz/360Hz/400Hz/480Hz/500Hz
❌ (Cannot support custom resolution, not supported 3440*1440)
- Troubleshooting & Indicators
Indicator Lights
POWER → Power indicator light
DP1 → Secondary PC detected
DP2 → Host PC detected
FUSER → Overlay enabled
If a light is off, that signal is not detected.
The fuser device only has the Power light on, and the DP1 or DP2 signal light is not on.
(1) First, confirm if the three wires are correctly plugged in. DP1 is the secondary unit and DP2 is the main unit.
(2) The DP1 light is the auxiliary graphics card signal light, which lights up when the fuser receives a signal, otherwise it does not light up.
The DP2 light is the signal light for the host graphics card. When the fuser receives a signal, it lights up, otherwise it does not light up
The reasons for DP2 or DP1 not lighting up may be:
① The DP line output by the fusion device is not properly plugged into the monitor; Countermeasure: Check if the video cable is properly plugged in;
Or confirm the direct connection of the graphics card to the monitor using a DP cable;
② The DP1 light is not on, and the DP1 cable of the auxiliary graphics card is not properly plugged in. Countermeasure: check the DP1 cable;
③ The DP2 light is not on, and the DP2 cable of the host graphics card is not properly plugged in. Solution: Check the DP2 cable;
④ The DP cable is broken or does not comply with DP1.4 or higher specifications. Solution: Replace with a better DP cable;
(3) Press the Reset button to reset once; Power off and restart the fuse switch once.
DP1/DP2 lights are all on, but the main display is not on/black. Countermeasures:
(1) Restart the fuse switch once;
(2) Connect the DP port of the graphics card of the host/slave to the main monitor via DP cable, and confirm
Is the output normal. After normal operation, reconnect the fusion device. Restart the fusion device once.
DP1/DP2 lights are all on, the main display can light up, but the screen is blurred/flashing/color cast. Countermeasures:
(1) The DP cable connecting the host/slave cannot be plugged in the opposite direction. DP1 is the slave and DP2 is the host;
(2) Adjust the output resolution of the host/slave to be the same;
(3) The refresh rate of the secondary graphics card cannot be higher than that of the main graphics card (it can be equal);
(4) The graphics card uses default color settings. Or change to RGB;
(5) The G-Sync (NVIDIA) or Free Sync (AMD) function of the graphics card must be cancelled;
Otherwise, there may be situations such as flashing back and screen flashing
(6) Switch to restart the fusion device once; Or press the [Reset] button to restore the fusion device to factory
The main display screen is normal and the resolution is the same, but there is no fusion effect. Countermeasures:
(1) Set the background of the secondary computer to pure black (Rightclick/Personalization/Background/Solid Color);
(2) Press the ‘Fuse’ button, the ‘Fuse’ indicator light will turn on, and the fusion function will be activated;
(3) If there is no Fuser effect yet, press the Fuse key continuously to increase the perspective effect (continuous cutting can cyclically change the strength of the fused perspective effect)
Can the secondary computer be used as a laptop? Can the computer be connected to multiple monitors?
(1) It is possible to use a laptop as a secondary device. Desktop computers can also be connected to multiple screens. As long as the graphics card has good performance.
(2) Switch from multi screen output mode to expansion mode. Method: Right click on the mouse/display settings, set Expansion mode. Remember to set the channel that outputs to the fusion device as the main display mode.
(3) After setting the expansion mode, the output resolution of the secondary machine should be consistent with the resolution setting of the main machine.
Can I use Fuser if I only turn on the host computer and not the secondary computer?
cannot use,Both the host computer and the secondary computer need to be turned on, and neither is indispensable.